Decorating Techniques for Themed Cakes
Decorating themed cakes is an art that transforms a simple dessert into a memorable centerpiece for any occasion. Whether you’re working on a birthday cake, a wedding cake, or a seasonal masterpiece, the right techniques can elevate your creation from ordinary to extraordinary. In this comprehensive guide, we’ll explore essential cake decorating techniques and tips to help you create stunning themed cakes that are sure to impress.
Introduction to Themed Cake Decorating Techniques
Themed cake decorating is more than just applying icing; it’s about bringing a vision to life. Whether you’re working on a character-themed cake or employing decorating techniques for themed cakes with a more elegant design, understanding the fundamentals is crucial. These basics not only help in achieving a professional look but also ensure that the cake remains structurally sound and delicious.
Importance of Themed Cake Decorating
Themed cakes offer a unique way to personalize any event. From weddings to birthdays, they capture the essence of the celebration. Using the right decorating techniques for themed cakes can turn your creation into a work of art, making it the focal point of your event. These cakes are not only visually appealing but also serve as a reflection of the occasion’s mood, theme, and character.
Creating a themed cake involves several layers of planning and execution. From choosing the right cake base to selecting the color scheme, every step plays a crucial role in achieving the final look. Decorating techniques for themed cakes are essential to ensure that the cake aligns perfectly with the event’s theme. It’s vital to consider the preferences of the person the cake is for, as well as the specific theme of the event. For instance, a superhero-themed cake for a child’s birthday might feature bright colors, bold designs, and iconic symbols. In contrast, a wedding cake might utilize decorating techniques for themed cakes that focus on elegance, incorporating subtle colors and delicate details.
Essential Tools and Materials for Cake Decorating
Before diving into the decorating process, it’s important to gather the necessary tools. The right equipment can make a significant difference in the ease and outcome of your work.
Basic Tools Needed for Themed Cake Decoration
When it comes to cake decorating, having the right tools is half the battle. Here are some essentials:
- Piping Bags and Tips: Piping bags are crucial for creating intricate designs. The type of tip you use will determine the shape and texture of the icing. For example, round tips are great for writing and dot work, star tips for borders and rosettes, and petal tips for creating flowers.
- Spatulas and Smoothers: These tools help achieve a smooth finish on your cake’s surface. A straight spatula is ideal for spreading icing evenly across the cake, while an offset spatula helps reach difficult angles. A smoother or bench scraper is essential for achieving sharp, clean edges on your cake.
- Fondant Tools: Working with fondant requires specific tools such as rollers, cutters, and molds. A fondant roller helps roll out the fondant evenly, while cutters allow you to create various shapes. Molds are used to create detailed fondant decorations, adding a professional touch to your cake.
- Turntable: A turntable is indispensable for any serious cake decorator. It allows you to rotate the cake smoothly, making the decorating process much easier. This is particularly useful when applying icing or when working with intricate designs that require a steady hand.
For a comprehensive guide on cake decorating supplies, you can refer to this essential cake decorating supplies resource.
Specialty Tools for Specific Themes
Depending on the theme of your cake, you may need some specialty tools:
- Molds and Stencils: These are perfect for creating uniform shapes and patterns that match your theme. For instance, if you’re making a princess-themed cake, you might use molds to create crowns or stencils to create delicate lace patterns.
- Airbrush Kits: Airbrushing is a technique used to add color gradients or create a professional finish on large surfaces. An airbrush kit allows you to apply color evenly and create stunning effects, such as ombre patterns or realistic textures like wood grain or marble.
- Edible Pens and Markers: These tools are great for adding fine details to your cake. Edible pens allow you to draw directly on fondant or royal icing, perfect for adding text or intricate designs.
Recommended Brands and Where to Purchase
Choosing the right brands for your tools and materials can make a big difference in the quality of your work:
- Wilton: Known for their wide range of cake decorating supplies, Wilton is a trusted brand among both amateur and professional bakers. They offer everything from piping tips to fondant tools and are widely available in stores and online.
- Ateco: Another popular brand, Ateco specializes in professional-grade tools, including high-quality piping tips and spatulas.
- Amazon: For convenience, Amazon offers a vast selection of cake decorating tools from various brands, often at competitive prices.
Investing in high-quality tools can save you time and frustration in the long run, making your cake decorating experience more enjoyable and successful.
Step-by-Step Guide to Decorating Themed Cakes
Once you have your tools ready, it’s time to dive into the actual decorating process. This step-by-step guide will walk you through the key stages of creating a beautifully themed cake.
Choosing the Right Cake Base
The foundation of any great cake is its base. Choosing the right flavor and texture can make or break your design. For themed cakes, it’s often best to use a denser cake that can support the weight of heavy decorations.
- Popular Choices: Chocolate, vanilla, and sponge cakes are common bases. For a sturdier option, consider a pound cake or fruit cake. These denser cakes hold up well under layers of icing, fondant, and decorations, ensuring that your cake remains stable and doesn’t collapse under its own weight.
- Preparation Tips: Ensure your cake layers are even by using a cake leveler. This will provide a stable surface for decorating. If you don’t have a cake leveler, you can use a serrated knife and a steady hand to level the cake layers. It’s also a good idea to freeze your cake layers for about 30 minutes before leveling them, as this makes the process easier and less messy.
For ideas on cake bases and more, you might find the ultimate guide to birthday cakes helpful.
Leveling and Preparing Your Cake
Leveling your cake is crucial for achieving a professional look. Uneven layers can cause the cake to tilt or collapse, which is why this step should not be overlooked.
- How to Properly Level and Crumb Coat a Cake
- Use a serrated knife or a cake leveler to trim the tops of your cake layers. This ensures that each layer is flat and even, providing a stable base for your decorations.
- Apply a thin layer of frosting, known as a crumb coat, to seal in any loose crumbs. The crumb coat acts as a base layer of frosting that holds in crumbs, making it easier to apply the final coat of frosting smoothly. Once the crumb coat is applied, refrigerate the cake for about 30 minutes to let the frosting set.
Leveling your cake and applying a crumb coat might seem like extra steps, but they are essential for achieving a professional finish. These steps help create a smooth surface that is easier to decorate and ensures that your cake remains structurally sound.
Applying the Base Layer of Icing
Once your cake is prepped, the next step is to apply the base layer of icing. This layer not only provides a smooth surface for additional decorations but also enhances the flavor of the cake.
- Techniques for a Smooth Base Coat
- Use a spatula to apply a generous amount of icing to the cake. Start with a large dollop of icing on the top of the cake and spread it outwards towards the edges. Use a cake smoother or an offset spatula to smooth out the icing, creating an even layer.
- For a sharp edge, hold the spatula at a slight angle while rotating the cake. This technique helps create clean edges and a smooth finish, which is essential for a polished look.
To learn more about different icing techniques, you can explore mastering cake frosting techniques.
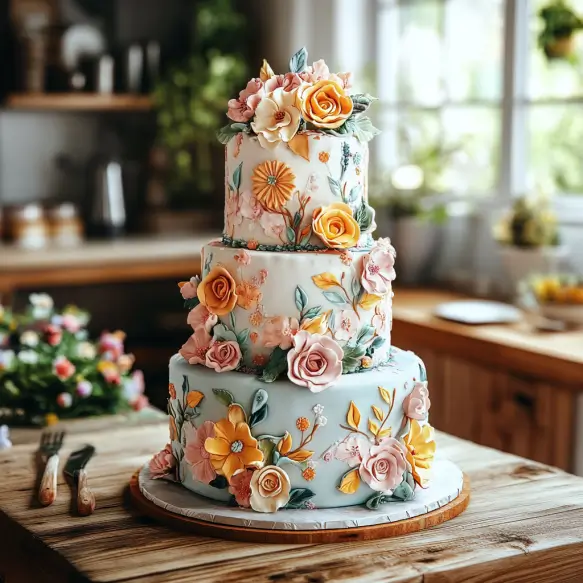
Decorative Techniques for Themed Cakes
This is where the magic happens. Decorating techniques vary widely depending on the theme of your cake. Below are some of the most popular methods.
Fondant Work
Fondant is a versatile medium that can be rolled, shaped, and sculpted into virtually any form. It’s often used for themed cakes because it provides a smooth, polished surface that can be easily colored and shaped.
- Rolling and Covering: Start by rolling the fondant evenly on a silicone mat to the desired thickness (usually about 1/8 inch). Cover the cake by draping the fondant over it and smoothing it out with a fondant smoother. Be sure to work out any air bubbles or wrinkles as you go.
- Creating Shapes: Use cutters and molds to create themed shapes that can be applied directly to the cake. For example, you can use star-shaped cutters for a superhero cake or flower molds for a garden-themed cake. Fondant can also be hand-sculpted into more complex shapes, such as figurines or intricate designs.
Buttercream Techniques
Buttercream is a favorite among decorators for its flavor and versatility. It’s easy to work with and can be used for a variety of techniques, from simple borders to elaborate flowers.
- **
Piping**: Use different piping tips to create borders, flowers, and other intricate designs. For example, a round tip is ideal for piping smooth lines and writing, while a star tip is perfect for creating rosettes and ruffled borders.
- Rosettes and Ruffles: These are perfect for adding texture to your cake. To create rosettes, use a star tip and pipe in a spiral motion. Ruffles can be made by moving the piping bag back and forth in a wavy pattern.
For more advanced buttercream techniques, this guide on frosting techniques can be a great resource.
Edible Prints and Transfers
Prints enable you to transfer almost any image onto your cake, making them perfect for character-themed designs.
- Application: Simply place the edible print on top of the cake and smooth it out with a fondant smoother or your fingers. Be sure to apply the print to a smooth surface, such as fondant or a well-smoothed buttercream layer, to ensure that the image transfers cleanly.
These prints are an excellent way to add detailed images without the need for hand-painting or intricate piping.
Airbrushing
Airbrushing can give your cake a professional finish with smooth color gradients. It’s a technique that involves spraying food coloring onto the cake using an airbrush machine.
- Tips for Smooth Gradients: Practice on a piece of parchment paper before applying it to the cake. Start by spraying lightly and build up the color gradually. Hold the airbrush at different angles and distances to achieve the desired effect. Airbrushing can be used to create a variety of effects, such as ombre patterns, realistic textures, or even scenes on the cake.
Airbrushing is an advanced technique, but with practice, it can add a truly professional touch to your cakes. It’s particularly effective for large cakes or when you want to create a smooth, seamless color transition.
Sugar Work
Sugar work involves creating decorations out of sugar or isomalt. It’s a more advanced technique, but the results can be stunning.
- Making Sugar Sculptures and Decorations: Melt sugar or isomalt and pour it into molds to create various shapes. Once hardened, these decorations can be added to the cake. Sugar work is perfect for creating delicate, glass-like decorations, such as sugar flowers, ribbons, or abstract shapes.
- Safety Tip: Be cautious when working with hot sugar, as it can cause severe burns. Always wear protective gloves and work in a well-ventilated area.
Chocolate Work
Chocolate is another versatile medium that can be used for a variety of decorative techniques. It can be melted, molded, and sculpted to create stunning cake decorations.
- Sculpting and Using Chocolate in Decorations: Melt chocolate and pour it into molds to create shapes, or temper the chocolate and sculpt it by hand. Chocolate decorations can range from simple curls and shavings to intricate sculptures and figurines.
- Chocolate Transfers: Use transfer sheets to create detailed designs on chocolate. Simply spread tempered chocolate over the transfer sheet, let it set, and then peel away the sheet to reveal the design.
Chocolate work is perfect for adding a touch of luxury to your cake. It’s also a delicious addition that complements the flavor of the cake.
Hand-Painted Cakes
Hand-painting on cakes is an advanced technique that allows you to create detailed, custom designs directly on the cake surface.
- Techniques for Painting Directly on Cakes: Use food coloring gels diluted with clear alcohol (such as vodka) to paint on fondant or well-smoothed buttercream. Brushes of various sizes will help you achieve different effects, from broad strokes to fine details.
- Design Ideas: Hand-painting is perfect for creating intricate patterns, floral designs, or even portraits. It’s a technique that requires a steady hand and some artistic skill, but the results can be breathtaking.
Hand-painting is one of the decorating techniques for themed cakes that allows for complete customization, turning a cake into a true work of art. This technique is especially effective for creating unique, personalized cakes that reflect the interests or personality of the recipient.
Theme-Specific Decorating Techniques
Different occasions call for different themes, and each requires its own set of decorating techniques. Below, we explore some of the most popular cake themes and the techniques used to create them.
Seasonal Themes
Seasonal cakes are all about capturing the essence of the time of year. Whether it’s spring, summer, fall, or winter, each season offers unique colors, motifs, and flavors that can be incorporated into your cake design.
Spring and Easter-Themed Cakes
Spring-themed cakes often feature pastel colors, flowers, and fresh flavors. For Easter, you might include elements like bunnies, eggs, and blossoms.
- Color Palette: Soft pastels such as pink, lavender, and mint green are popular choices for spring cakes.
- Decorative Elements: Use fondant to create flowers, leaves, and small animals like bunnies or chicks. Piping buttercream flowers or ruffles can also add a delicate, springtime feel to the cake.
Halloween and Fall-Themed Cakes
Halloween and fall-themed cakes embrace the rich, warm colors of the season, as well as spooky or rustic decorations.
- Color Palette: Orange, black, brown, and deep red are the go-to colors for fall and Halloween cakes.
- Decorative Elements: Use fondant or modeling chocolate to create pumpkins, ghosts, or fall leaves. You can also use edible prints to add Halloween-themed images like haunted houses or skeletons.
- Textures and Effects: Consider using airbrushing to add shadows and depth to your Halloween designs. For a rustic fall cake, you can use textured buttercream to mimic the look of wood or burlap.
Winter and Christmas-Themed Cakes
Winter and Christmas-themed cakes often feature cool colors, snowflakes, and festive decorations.
- Color Palette: Blue, white, silver, and gold are popular colors for winter cakes. For Christmas, you might also include red and green.
- Decorative Elements: Create snowflakes, icicles, and other winter motifs using royal icing or fondant. For a Christmas-themed cake, you can add fondant ornaments, candy canes, or a Santa figure.
- Edible Glitter: Add a touch of sparkle to your winter cake with edible glitter or luster dust. This can make your snowflakes and other winter elements shimmer beautifully.
Popular Character and Movie-Themed Cakes
Character cakes are a hit at children’s parties and other themed events. These cakes often feature beloved characters from movies, cartoons, or books.
Superhero Cakes
Superhero-themed cakes are popular for birthday parties and other celebrations. These cakes often feature bold colors and iconic symbols.
- Color Palette: Bright primary colors like red, blue, and yellow are common in superhero cakes.
- Decorative Elements: Use fondant to create superhero logos, masks, or capes. For example, a Superman cake might feature the iconic “S” shield, while a Batman cake could include the bat symbol.
- 3D Elements: Consider adding 3D elements like capes or figures to make the cake more dynamic. You can sculpt these elements out of fondant or modeling chocolate.
Disney-Themed Cakes
Disney-themed cakes are a favorite for children and Disney enthusiasts alike. These cakes often feature popular characters like Mickey Mouse, Elsa, or the Disney princesses.
- Color Palette: The colors will depend on the specific Disney character or movie theme. For example, a Frozen-themed cake might feature icy blues and whites, while a Little Mermaid cake could include seafoam greens and purples.
- Decorative Elements: Use fondant or edible prints to create the characters. You can also add themed decorations like seashells for a Little Mermaid cake or snowflakes for a Frozen cake.
For more character-themed inspiration, check out this Barbie cake guide.
Elegant and Formal Themes
Formal occasions like weddings and anniversaries require a more sophisticated touch. These cakes often feature elegant designs and subtle details.
Wedding Cakes with Intricate Designs
Wedding cakes are the epitome of elegance. They often feature intricate piping, delicate sugar flowers, and multiple tiers.
- Color Palette: White, ivory, and pastel colors are common for wedding cakes. Metallic accents in gold or silver can add a touch of luxury.
- Decorative Elements: Use royal icing or buttercream to pipe lace patterns or scrollwork. Sugar flowers, such as roses or peonies, are a popular choice for wedding cakes.
- Personalization: Consider adding elements that reflect the couple’s journey, such as fondant replicas of significant places or objects. This can make the cake more meaningful and personal.
Anniversary Cakes with Personal Touches
Anniversary cakes often commemorate a milestone in a couple’s life. These cakes can be as simple or elaborate as you like, depending on the theme of the celebration.
- Color Palette: The colors may reflect the couple’s preferences or the anniversary year. For example, gold is traditional for a 50th anniversary, while silver is used for a 25th anniversary.
- Decorative Elements: Consider incorporating the couple’s initials, a monogram, or a replica of their original wedding cake. Adding edible photos or fondant figures can also personalize the cake.
Anniversary cakes are a celebration of a couple’s journey together, and the decorating techniques for themed cakes should reflect that. Whether you choose a simple design or an elaborate one, the key is to make the cake meaningful and special.
Tips for Enhancing Themed Cake Decorations
Enhancing your cake with the right accessories and techniques can take it to the next level. Here are some tips to help you make your themed cakes even more impressive.
Using Cake Toppers
Cake toppers can add a focal point to your cake and are easy to customize. They are available in a wide range of designs, from simple to elaborate, and can be made from various materials like acrylic, wood, or fondant.
Choosing the Right Topper for Your Theme
Selecting a topper that complements the overall design without overpowering it is crucial. For example, a minimalist wedding cake might feature a simple monogram topper, while a children’s birthday cake could have a character-themed topper.
- Personalization: Personalized toppers with names, initials, or special messages can add a unique touch to your cake. These toppers are often laser-cut from wood or acrylic and can be painted or left natural.
- DIY Toppers: If you’re feeling creative, you can make your own topper using fondant or modeling chocolate. This allows you to match the topper perfectly to the cake’s theme and colors.
Adding Textures and Layers
Textures add depth and interest to your cake design. Incorporating different textures can make your cake look more complex and visually appealing.
Techniques for Adding Texture
- Textured Mats: Use textured mats to imprint patterns onto fondant or buttercream. Common textures include wood grain, lace, or quilting.
- Piping Techniques: Use different piping tips to create textured borders, ruffles, or rosettes. These techniques can add a tactile element to your cake, making it look more dynamic.
How to Create a Multi-Dimensional Look
- Combining Flat and Raised Elements: Mix flat decorations, like painted designs or edible prints, with raised elements, like fondant figures or sugar flowers. This creates a multi-dimensional effect that adds depth to your cake.
- Layering: Consider layering different elements to create depth. For example, you can add a base layer of fondant decorations, then layer on top with piped details or additional fondant shapes.
Using Color Effectively
Color is one of the most powerful tools in cake decorating. It can set the mood of the cake, complement the theme, and make your design stand out.
Color Theory in Cake Design
Understanding color theory can help you choose the right colors for your cake. Colors can evoke emotions and set the tone for your design.
- Complementary Colors: These are colors that are opposite each other on the color wheel, such as blue and orange. Using complementary colors can create a vibrant, eye-catching contrast.
- Analogous Colors: These are colors that are next to each other on the color wheel, such as blue and green. Using analogous colors creates a harmonious, soothing effect.
Creating a Cohesive Color Scheme
When choosing colors for your cake, consider the overall theme and the message you want to convey.
- Limit Your Palette: Stick to a palette of 2-3 main colors with additional accents for balance. This prevents the cake from looking too busy or overwhelming.
- Use Shades and Tints: Experiment with different shades (darker versions) and tints (lighter versions) of your main colors to add depth and variety to your design.
Using color effectively can transform a simple cake into a visually stunning masterpiece. It’s important to plan your color scheme carefully to ensure that all the elements of your cake work together harmoniously.
Common Mistakes and How to Avoid Them
Even experienced decorators can make mistakes. Here are some common pitfalls and how to avoid them.
Top 5 Cake Decorating Mistakes
- Overloading on Decorations
- Less is often more. Focus on a few key elements rather than overcrowding the cake. Overloading the cake with too many decorations can make it look cluttered and distract from the main design. Choose decorations that complement each other and the overall theme.
- Incorrect Frosting Consistency
- Ensure your frosting is the right consistency for the technique you’re using. If the frosting is too thick, it can be difficult to spread or pipe, while frosting that is too thin can run or fail to hold its shape. Always test your frosting consistency before applying it to the cake.
- Not Allowing Enough Cooling Time
- Always let your cake cool completely before decorating. If the cake is still warm, the frosting can melt, making it difficult to work with and causing the decorations to slide off. Allowing the cake to cool properly ensures that the frosting adheres well and creates a smooth surface.
- Misaligning Layers
- Use a cake leveler to ensure each layer is even. Uneven layers can cause the cake to tilt or collapse, making it difficult to decorate. Align the layers carefully and use a small amount of frosting between each layer to help hold them in place.
- Rushing the Decoration Process
- Take your time to avoid mistakes and achieve a polished result. Rushing can lead to errors and a less-than-perfect finish. Plan your decorating process carefully, and give yourself plenty of time to execute each step.
Avoiding these common mistakes can help you create a cake that not only looks professional but also tastes great. Attention to detail and patience are key to successful cake decorating.
FAQs About Themed Cake Decorating
- What is the best icing for themed cakes?
- Buttercream and fondant are the most popular choices due to their versatility. Buttercream is easy to work with and can be flavored and colored to match your theme, while fondant provides a smooth, polished finish that is ideal for detailed decorations.
- How do you freeze a decorated cake?
- First, chill the cake until the icing hardens. Then wrap it tightly in plastic wrap and foil before freezing. This helps prevent freezer burn and preserves the cake’s flavor and texture. When you’re ready to serve the cake, thaw it slowly in the refrigerator to minimize condensation.
- Can you use food coloring in any type of icing?
- Yes, but it’s best to use gel or paste colors to avoid altering the icing’s consistency. Liquid food coloring can thin out the icing, making it difficult to work with. Gel and paste colors are more concentrated and provide vibrant colors without affecting the texture of the icing.
- What can I use instead of fondant?
- Buttercream or marzipan can be good alternatives, depending on the look you’re going for. Buttercream provides a soft, creamy texture, while marzipan has a firmer consistency and a nutty flavor. Both can be used to create smooth surfaces and intricate designs.
- How do you transport a decorated cake safely?
- Place the cake in a sturdy box and use non-slip mats to keep it from sliding. Transport the cake in a cool environment, and if possible, assemble the cake at the venue to avoid damage during transit. Consider using dowels or other supports to keep tiered cakes stable during transportation.
Conclusion
Decorating themed cakes is a rewarding endeavor that allows you to showcase your creativity. With the right decorating techniques for themed cakes and tools, you can create cakes that not only look amazing but also taste incredible. Whether you’re a beginner or an experienced decorator, these tips will help you take your skills to the next level.
Creating a themed cake is a journey that involves planning, patience, and a bit of artistry. Each step, from choosing the right cake base to applying the final decorative touches, plays a crucial role in the final result. With practice and a keen eye for detail, you can master the decorating techniques for themed cakes that will make your creations the highlight of any event.
Remember, the key to successful cake decorating is to enjoy the process. Each cake is a blank canvas waiting for your creativity, so don’t be afraid to experiment with different decorating techniques for themed cakes and styles. Happy decorating!
To further enhance your themed cake decorating skills, you might also be interested in these related topics: